Follow along with published screenshots of real Gmail screens below. They show example accounts and some older layouts; use your own addresses and the written settings in this guide. Select any screenshot to see it at full size.
Step 1 · New account
Create a separate inbox
Open Google Account signup (opens in a new tab) and create a personal account with a new Gmail address. Save its sign-in details, set up recovery options and protect the account with 2-Step Verification.
Use a distinct Google account for this inbox. A label or an alias on your existing account does not create a separate mailbox. Keep the new inbox for the transaction emails you want Cashflow to process.
 View full size
Step 2 · Main inbox → dedicated inbox
Verify your forwarding address
2.1 Open your main inbox’s settings
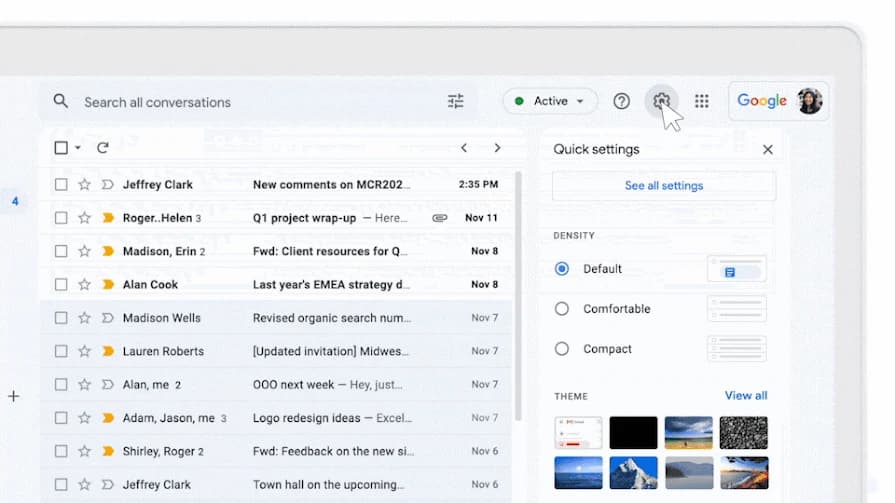
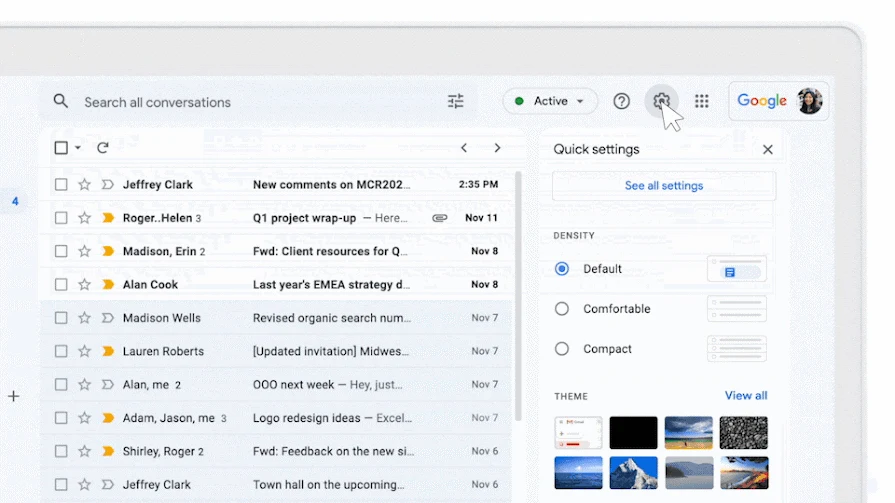
In your main Gmail account, open Settings → See all settings.
 View full size
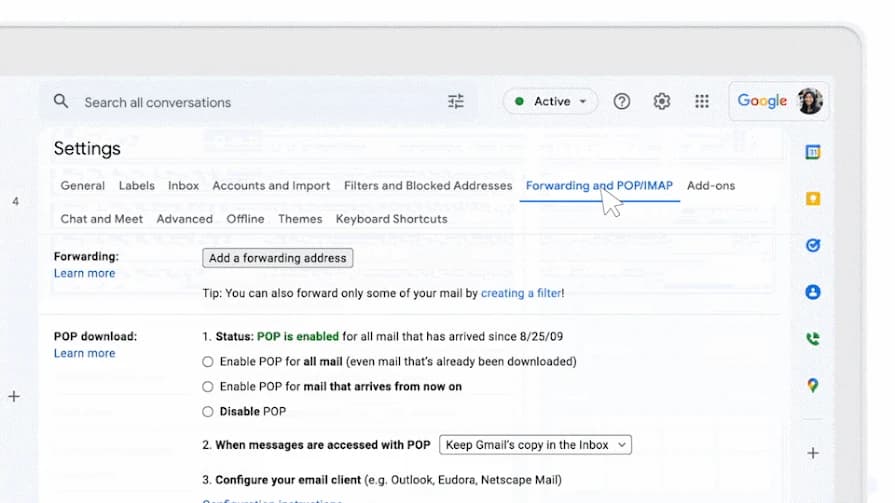
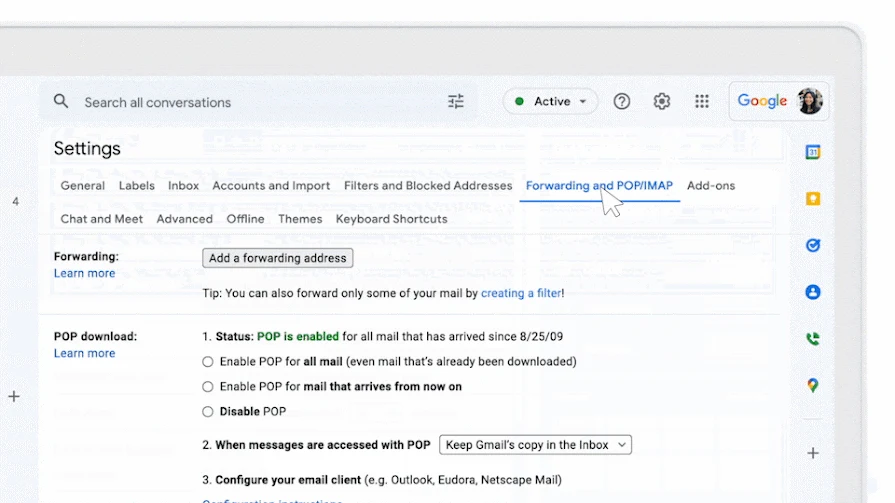
The gear opens Quick settings. Choose See all settings at the top of the panel. Screenshot: Google (opens in a new tab). Choose Forwarding and POP/IMAP (or Forwarding).
 View full size
Find the Forwarding section at the top of this tab. Screenshot: Google (opens in a new tab). 2.2 Add the dedicated address
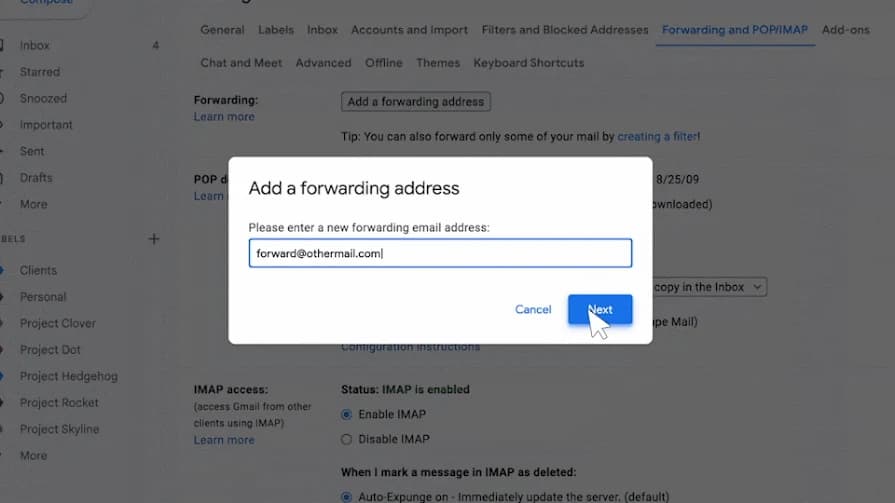
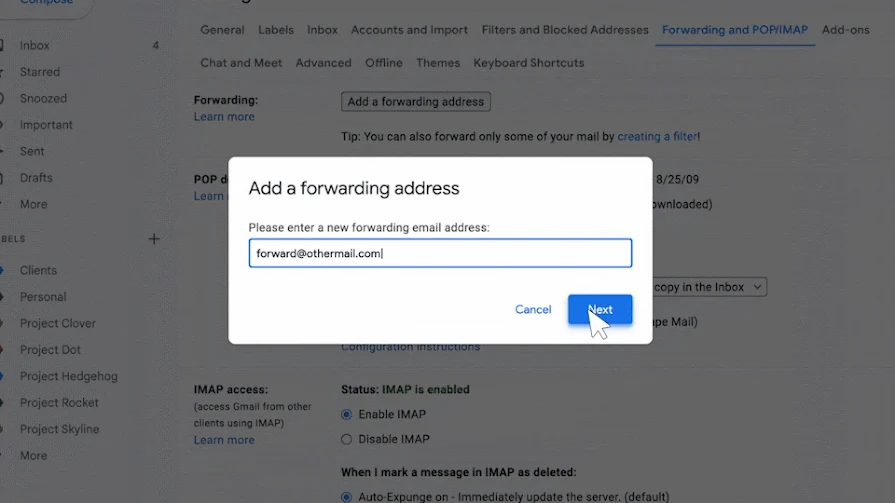
Choose Add a forwarding address. Enter your dedicated Gmail address and follow the prompts.
 View full size
Enter your new Gmail address here. Google’s example uses a Hotmail address; replace it with your dedicated Gmail address. Screenshot: Google (opens in a new tab). 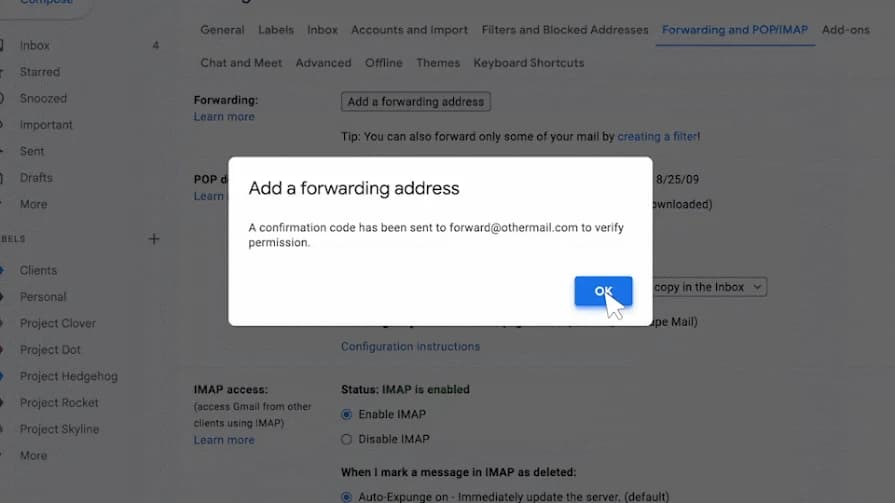 View full size
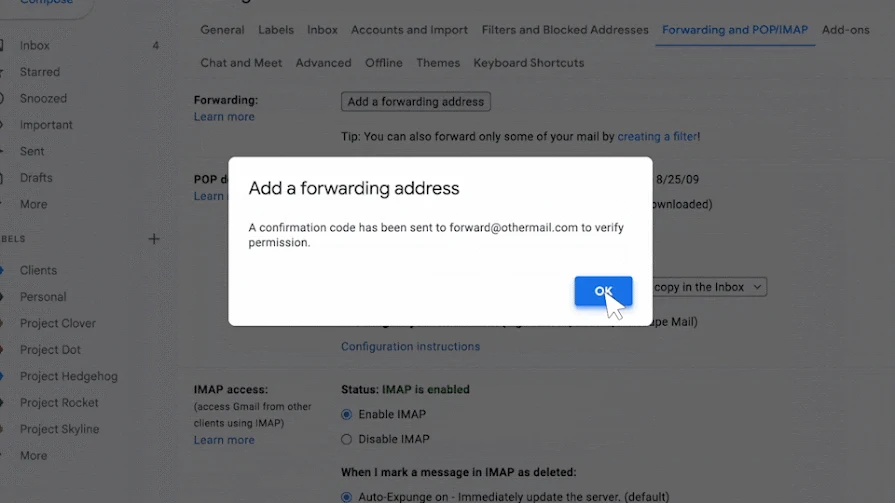
This confirms Google sent the verification message. The destination still needs verification. Screenshot: Google (opens in a new tab). 2.3 Verify in your dedicated inbox
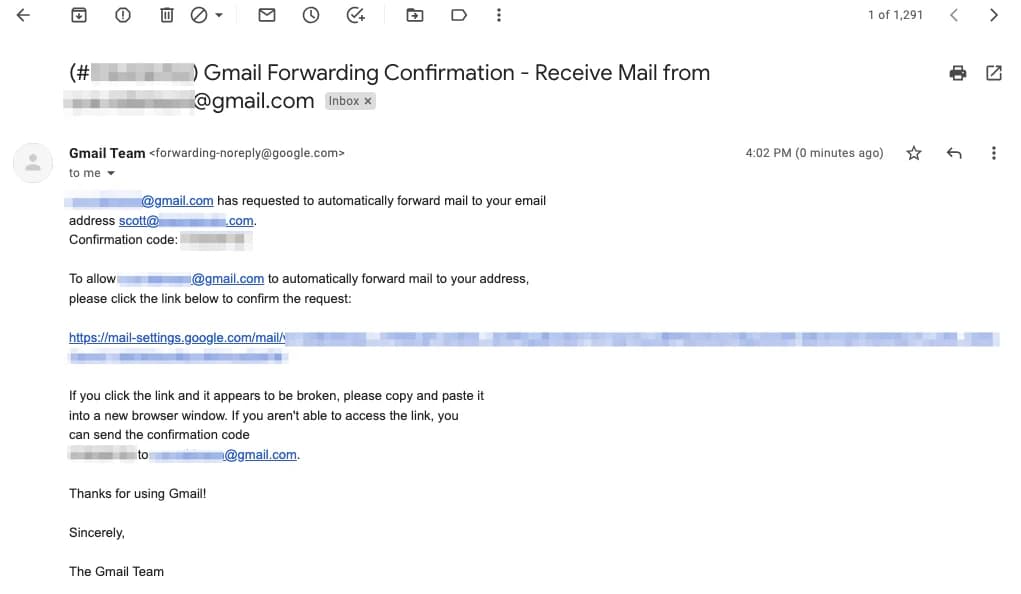
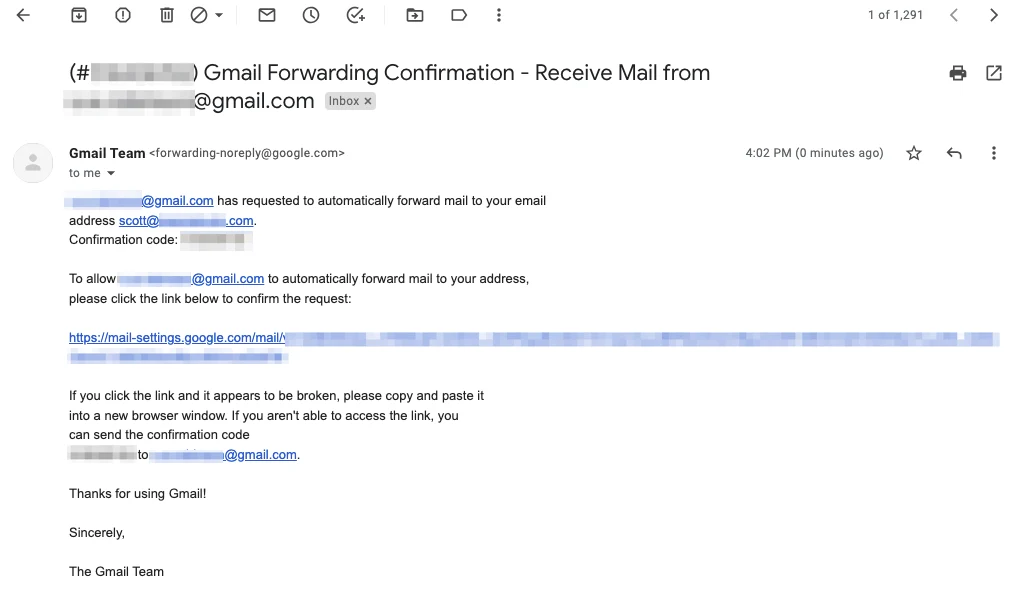
Open the verification message in your dedicated inbox and confirm using Google’s link.
 View full size
Look for the forwarding confirmation email. Open the link in your own message; the addresses and link in this example are blurred. Screenshot: Block Sender (opens in a new tab). 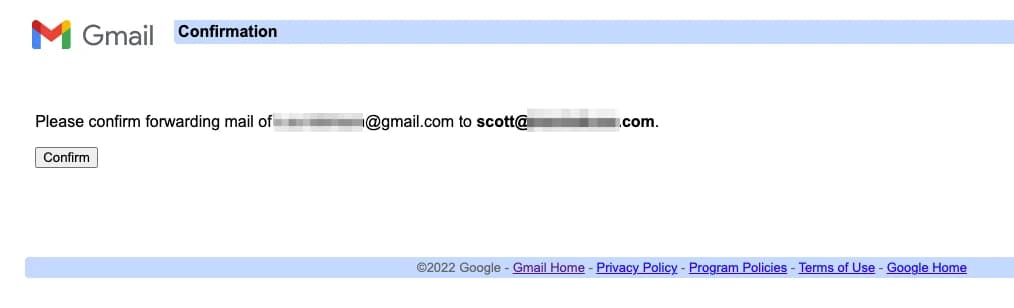 View full size
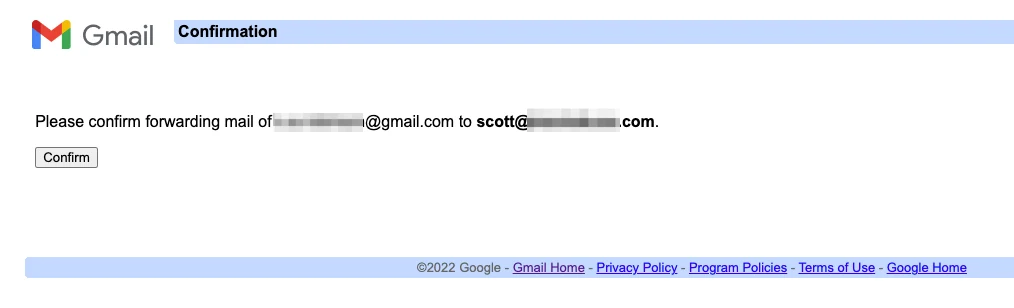
If Google shows this confirmation page, check the two addresses and choose Confirm. Screenshot: Block Sender (opens in a new tab). 2.4 Keep inbox-wide forwarding disabled
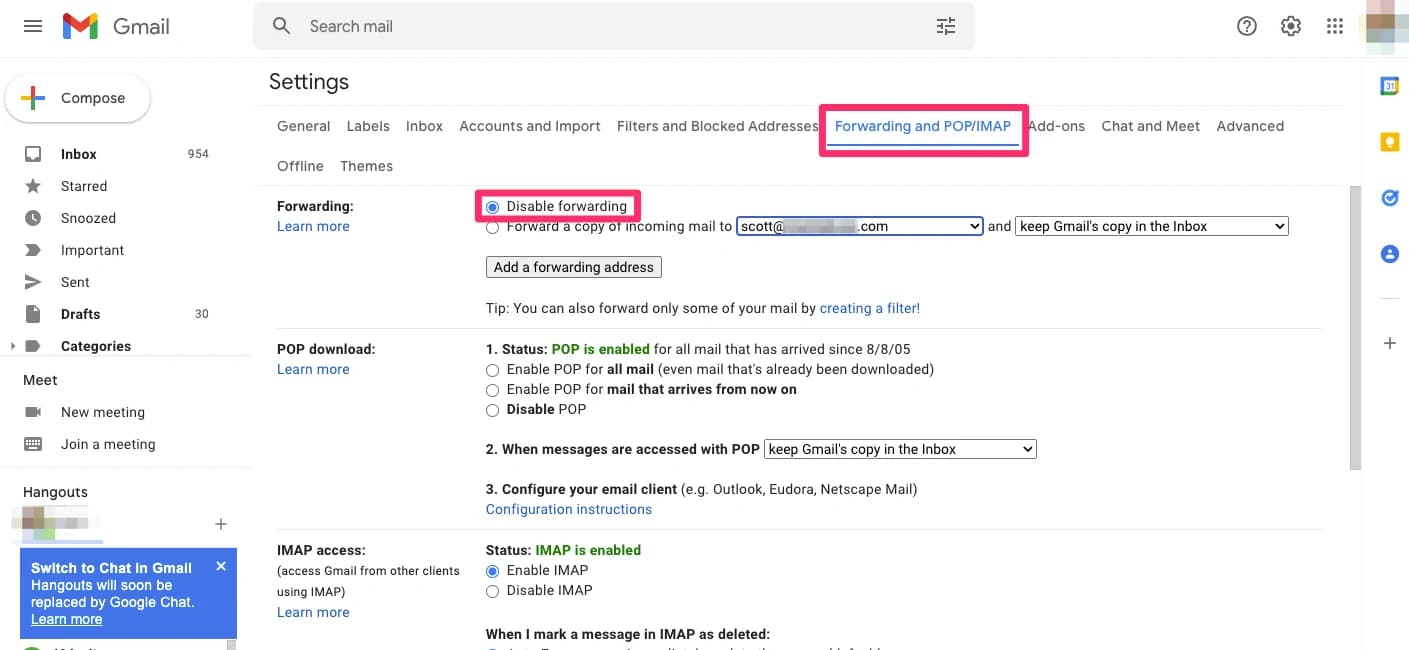
Return to your main inbox and refresh its settings. Keep Disable forwarding selected and save any changes. The filters in the next step will forward selected messages.
 View full size
Keep Disable forwarding selected. Your verified address remains available for individual forwarding filters. Screenshot: Block Sender (opens in a new tab).
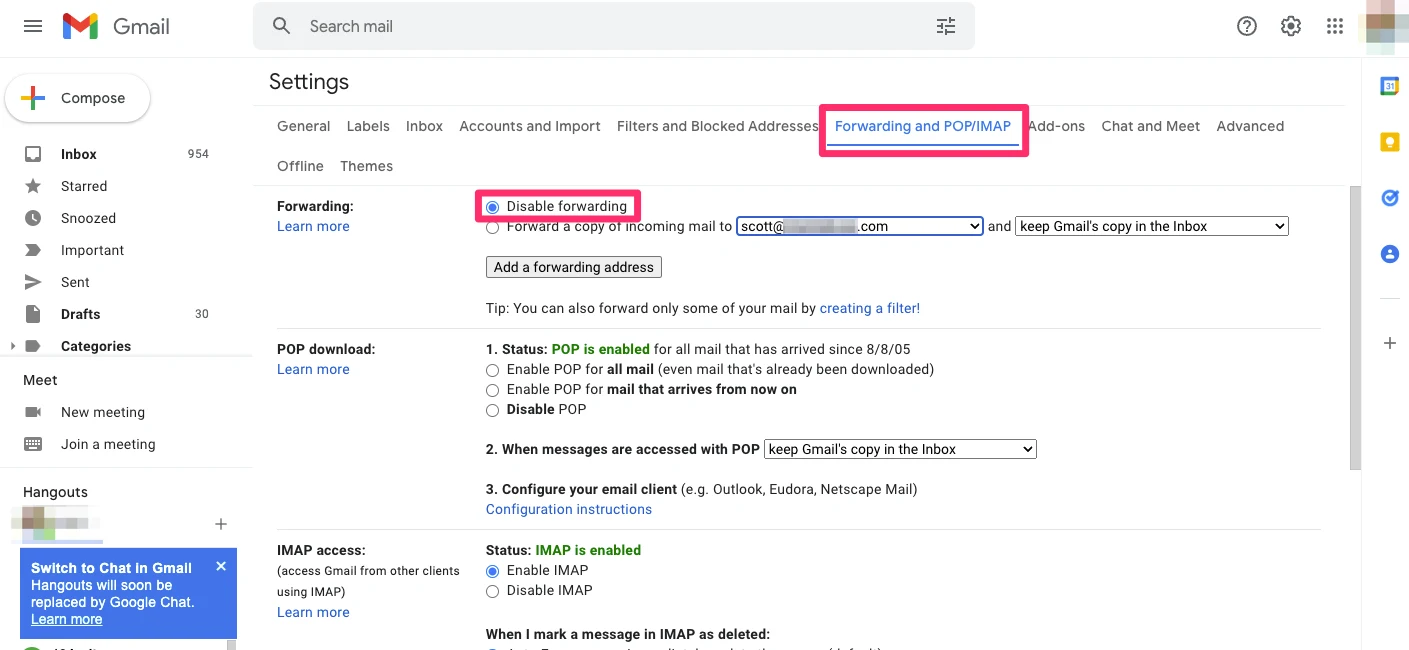
Avoid enabling “Forward a copy of incoming mail to”: that sends all new non-spam messages, including personal mail.
Step 3 · Main inbox
Choose which emails to forward
Start with a genuine transaction alert already in your main inbox. Use its exact sender address and a stable part of its subject to narrow the match. Avoid a bank-wide sender rule that could also include login codes or security messages.
3.1 Start from a transaction alert
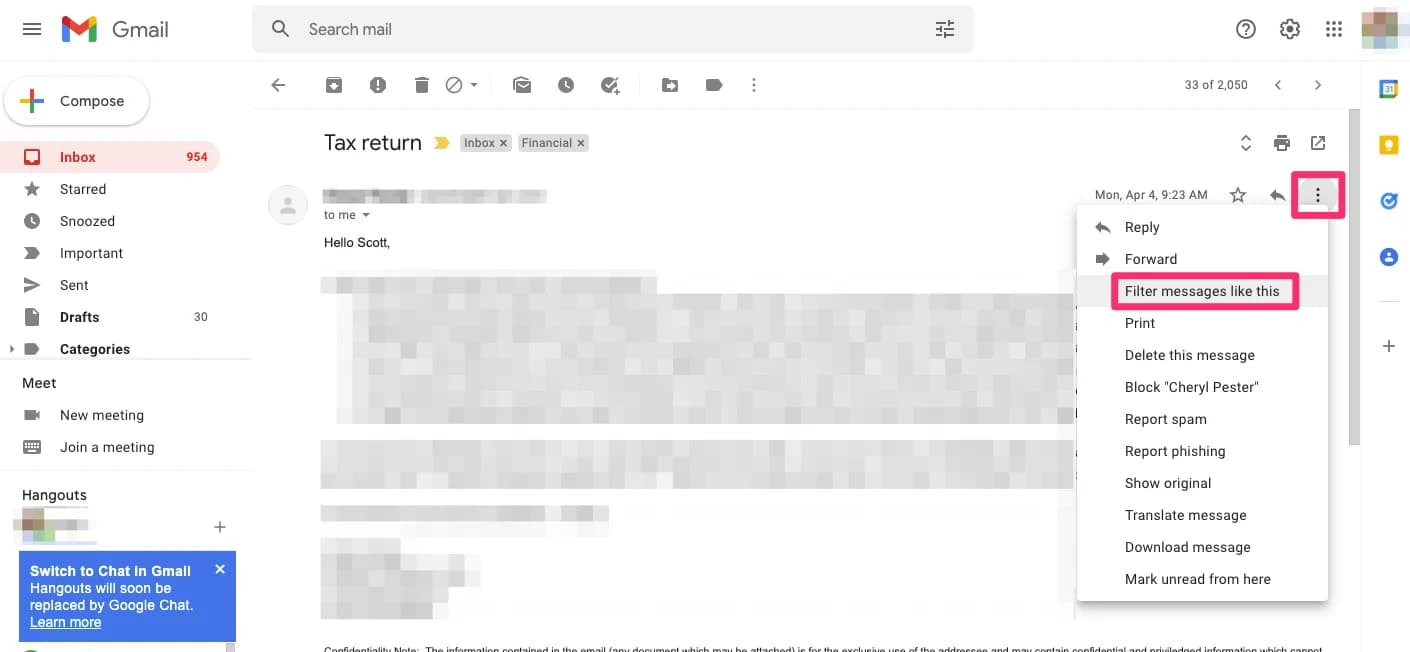
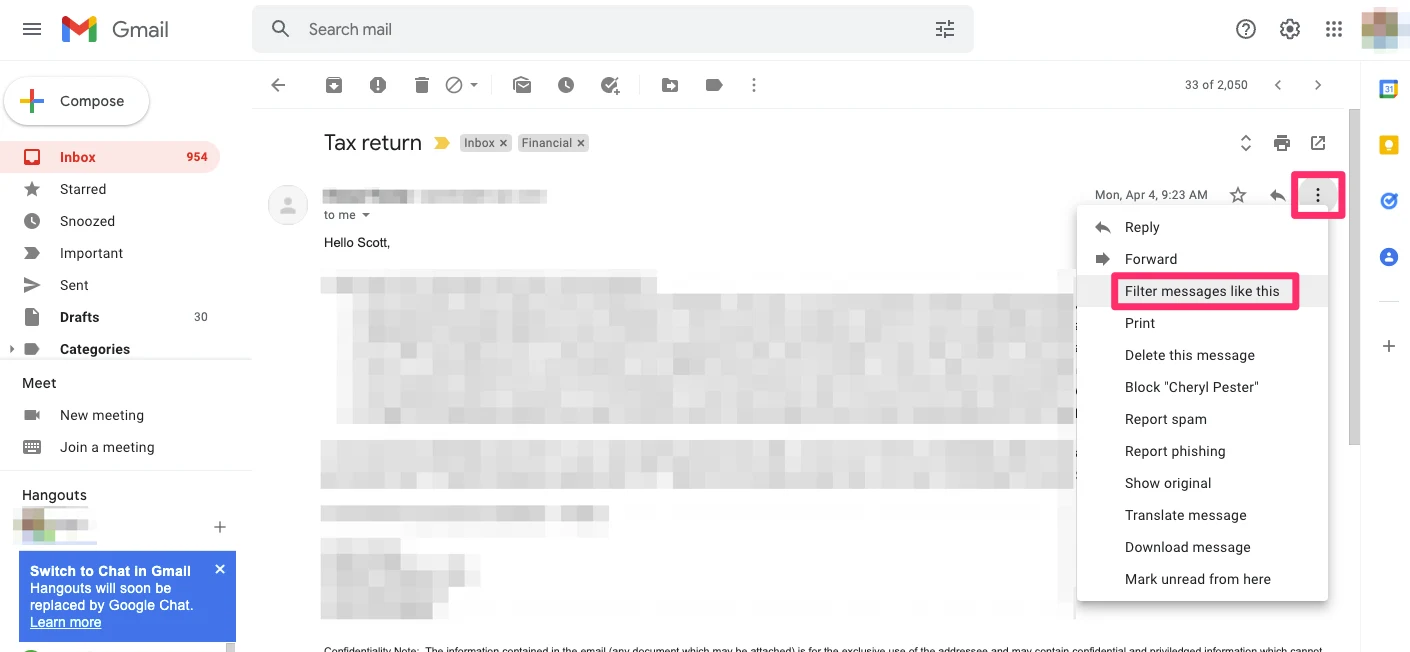
Open an alert’s three-dot More menu and choose Filter messages like this.
 View full size
This example uses an unrelated email to show the menu. In your account, start from a genuine bank transaction alert. Screenshot: Block Sender (opens in a new tab). 3.2 Match the sender and subject
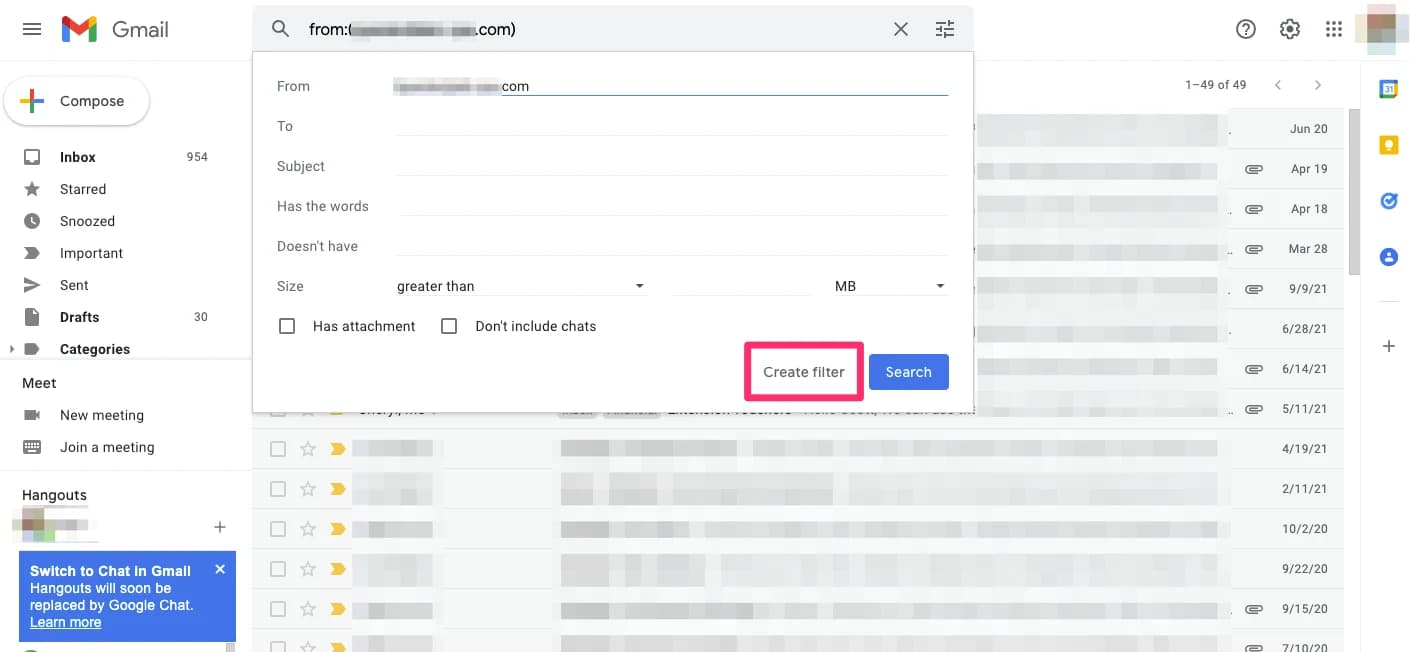
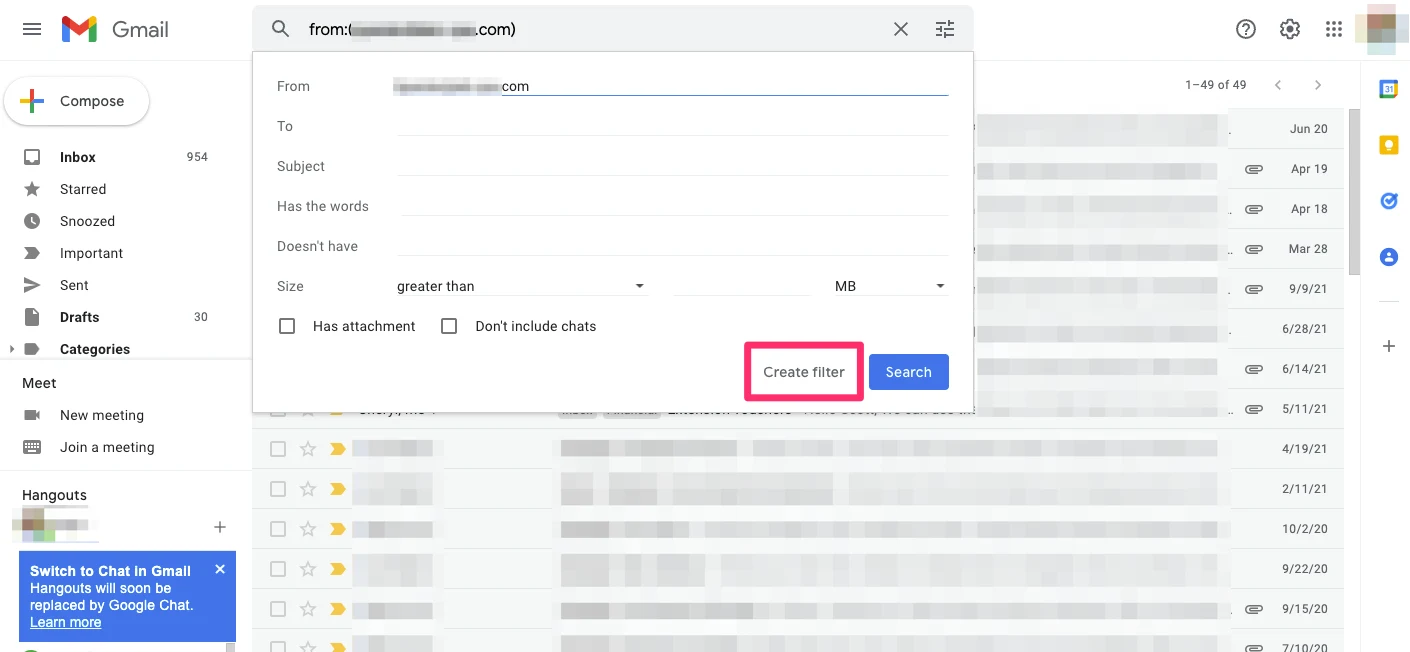
Check From and add a Subject condition for that alert type. Leave out changing amounts, dates and merchant names. Run Search and inspect the matches, then reopen search options and choose Create filter.
 View full size
Fill in both From and Subject using your bank alert. The source screenshot has only From filled in; add the subject to narrow your rule. Screenshot: Block Sender (opens in a new tab). 3.3 Choose the forwarding destination
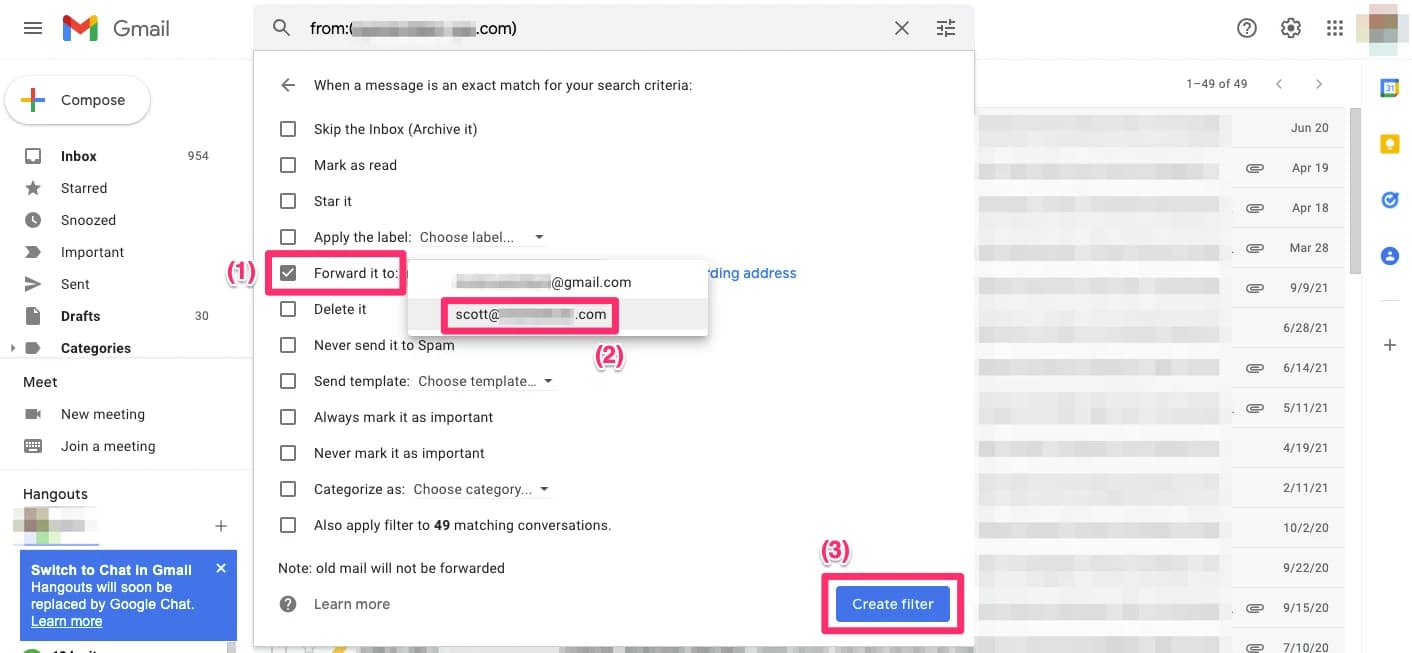
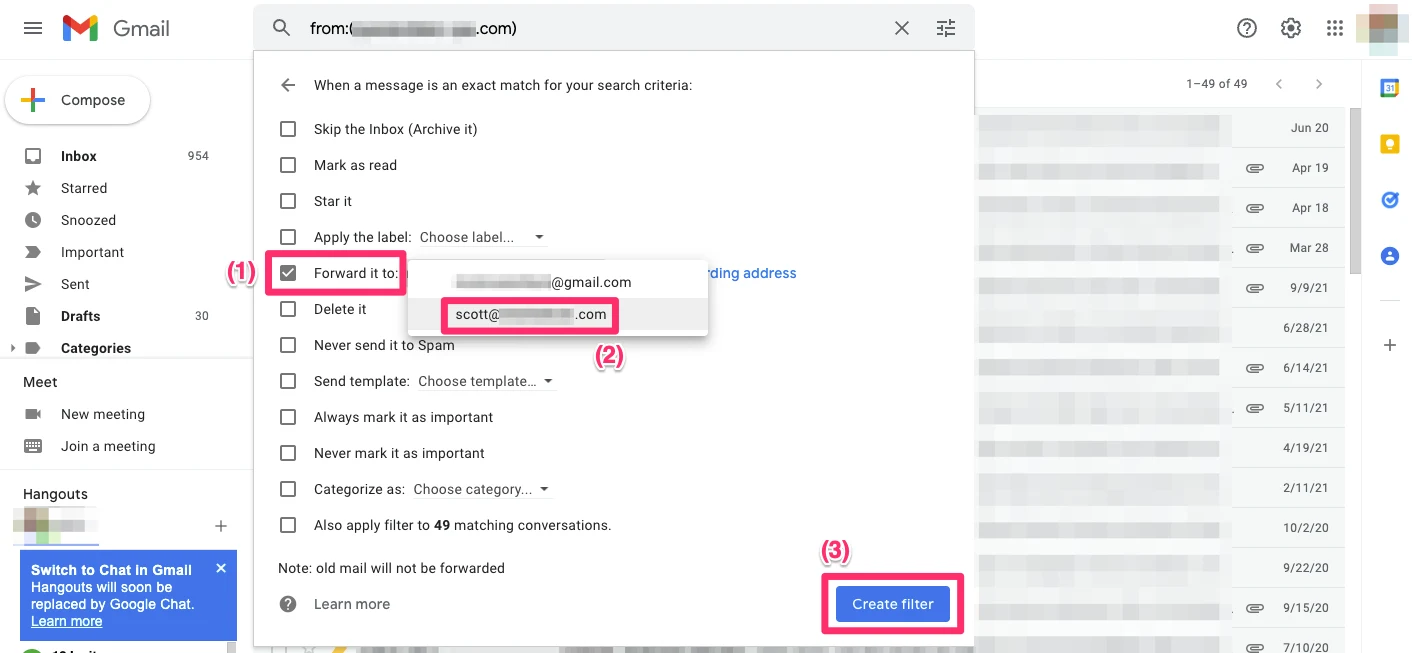
Select Forward it to your verified dedicated address, then create the filter. Leave archive and delete actions unchecked to keep originals.
 View full size
Tick Forward it to, choose your dedicated Gmail address and save with Create filter. Existing messages will not be forwarded. Screenshot: Block Sender (opens in a new tab).
Repeat for each bank and alert type. Sender addresses and subjects can change, so review coverage when a bank changes its emails.
| Bank | From | Subject |
|---|---|---|
| UOB | [email protected] | UOB - Transaction Alert |
| OCBC | [email protected] | CARD TRANSACTION ALERT |
| Citibank | [email protected] | Citi Alerts - Credit Card/Ready Credit Transaction |
| DBS | [email protected] | Card Transaction Alert |
Compare these examples with your own genuine alerts before saving a rule. These cover card purchases; payments, reversals and bank account alerts may use different subjects and need their own filters. A matching sender or subject alone does not prove an email is authentic.
Forwarding filters affect new arrivals only. Applying a filter to existing conversations does not forward your old transaction emails.
Step 4 · Cashflow
Connect the dedicated Gmail account
In Cashflow’s Gmail connection flow, select your dedicated account. Check the email address on Google’s consent screen before granting access. Add the supported cards and bank accounts whose alerts you are forwarding.
Already connected your main inbox? On Cashflow’s Home tab, find the Gmail connection row and check the displayed address. Tap Disconnect, then Sure? to confirm. Tap Connect and choose the dedicated Google account. Check that the row now shows its address.
Enable bank transaction emailsStep 5 · Check delivery and import
Test the whole journey
Use the next normal purchase that triggers a bank email after your filter is saved.
- Find the original transaction alert in your main inbox.
- Confirm a matching copy arrives in the dedicated inbox, with its transaction details intact.
- Open Cashflow’s Home tab, check the connected Gmail address and matching card or account, then pull down to refresh. Confirm the transaction appears when syncing finishes.
- Check the dedicated inbox contains only the messages you intended to forward. Narrow any filter that includes unrelated mail.
Cashflow looks for supported bank senders and subjects, then reads the transaction details. Use automatic forwarding; manually forwarding a message changes its sender and can prevent a match. Confirm an import for each bank and alert format before relying on this setup. If a format fails, consider having the bank send alerts directly to the dedicated address where supported; check which other bank communications an email-address change would affect.
Troubleshooting & changes
The alert reaches my main inbox, but no copy arrives
Confirm verification and the filter’s destination, then check its criteria against a new alert. Check Spam in both inboxes; Gmail excludes spam from automatic forwarding. Work or school accounts may restrict forwarding through administrator settings.
The copy arrives, but Cashflow shows no transaction
Confirm the Gmail address shown on Home and that the relevant card or account is added with the correct last four digits. Pull down on Home to sync. If the alert stays missing, open Sync diagnostics near the bottom of Home to check for errors. The sender, subject or forwarded format may not match a supported alert.
How do I change or stop forwarding?
In your main Gmail account, open Settings → See all settings → Filters and Blocked Addresses. Edit or delete the relevant forwarding filters. Disabling inbox-wide forwarding alone does not remove those rules. Existing copies remain in the dedicated inbox until you delete them.
My main inbox is with another email provider
Create the dedicated Gmail account, then use your provider’s official instructions for selective forwarding rules. Menu names and options differ. Verify the destination and test an actual transaction alert before connecting the inbox to Cashflow.
Official references
- Create a Google Account for Gmail (opens in a new tab)
- Automatically forward Gmail messages to another account (opens in a new tab)
- Create, edit and delete Gmail filters (opens in a new tab)
Screenshot credits
Forwarding settings screens are still frames from Google’s official tutorial. Account creation is shown in Mailmeteor’s account setup tutorial (opens in a new tab). Verification and filter screenshots come from Block Sender’s Gmail forwarding walkthrough (opens in a new tab). Images retain their original example values, annotations and privacy blurring. Copyright remains with the respective owners.
Google’s screens and options may change. This independent Cashflow guide is not endorsed by Google. See our privacy policy for how Cashflow handles connected Gmail data.